Let's start off February with a tip of the tri-corn hat to President George Washington and the little fable of him chopping down the cherry tree. Honesty IS the best policy. I love the part in the story where he tells his father the truth about his participation in the "crime". Even though he is afraid of his punishment, he tells the truth.
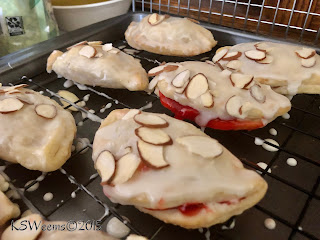
"Run to my arms, you dearest boy, cried his father in transports, run to my arms; glad am I, George, that you killed my tree; for you have paid me for it a thousand fold. Such an act of heroism in my son, is more worth than a thousand trees, though blossomed with silver, and their fruits of purest gold.Last year, my husband and I decided to buy a couple of cherry trees in hopes that one day we will have a wonderful supply of the juicy fruit that we can make homemade pie filling from. They are still young but the blooms in the spring... beautiful!! For the time being though, I think I will have to be satisfied with some canned filling. The recipe I chose this week incorporates pie filling along with almond flavoring and a crispy pie crust to make a Cherry Almond Hand Pie. Thanks, Aimee from the Blog "Shurgary Sweets" for the recipe and guys, you can go HERE and find the recipe yourselves.
I'm going to use the Fool-Proof Pie Crust recipe from last week because it worked fabulously! And a can of Country Cherry Pie filling from Walmart.
This crust recipe... Man, the way the butter goes throughout the dough and the ease of rolling it out... It has quickly become my favorite!
Another little gizmo I'm going to try for the first time is a dough press I found at Ross last month.
Cut with this side down on the dough...
Fill them with the filling...
Crimp the dough closed...
And voile! A beautiful little hand pie!
You don't need to have the hand pie dough press to make these. You could always use a fork to crimp or even some fancy hand crimping that gives the same effect. But it was so easy to make them this way and the set I found was less than $4 to buy, well worth it to me.
I used 1 recipe of the Fool-Proof Pie dough which made 2 homemade crusts and got 28 little pies from it. They were cooked on parchment paper 8 to a tray for 15 min. at 425 degrees. Did my house ever smell good!!!
As soon as they came out of the oven, they were brushed with the glaze from the recipe. For added flavor, I put in about 1/2 tsp of almond flavor to keep that goodness going. Immediately I added on the sliced almonds and they were left to cool. Less than 15 min. later the glaze had hardened up and I was able to see how they tasted. Wow! So good!
They lost some of that cute little edge detail as they baked but came out cute just the same!
Thank goodness I have some grandkids to share these with and a hungry hubby! I was also surprised that they weren't over the top sweet. You'd think that with a sugary filling and sugar glaze on the top that they would just be over the top but it was fresh and fruity and just the right amount of sugar. If you can eat them right away nice and warm that would be great. If not, warm them just a bit in the microwave for about 15 seconds and serve with a teeny tiny scoop of vanilla ice cream.
Now, I'm thinking of all the other ways I can use the other 2 sizes of little dough presses and what kind of goodness I can tuck inside. This will NOT be the last time you see these little dough shapers at work! I love them.
How about you guys? Do you just LOVE picking things up at the discount stores and trying them out? Gosh, I'm a gismo girl!! I like to do things fast too and I think it would have taken a LOT more time making all of those little pies by hand.
Anyway, much love to you guys and hope you come back next week for more pie!!
Karen


Comments