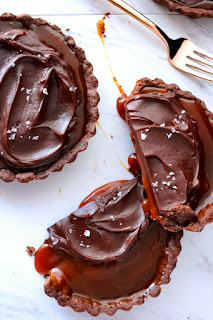
Back with Week #7 of my 52 weeks of pie! Like most of us, I wanted to create a really beautiful pie, well actually a tart, especially for my Valentine, Wes. It had to be chocolate, decadent and beautiful all at the same time. After looking high and low on the internet for something good, I decided on THIS wonderful Salted Caramel Chocolate Tart featured on the Frayed Apron Blog. I mean, look at her picture! Who wouldn't want to make and eat this??!!
(From the Frayed Apron Blog)
Now, you may say a Tart isn't a Pie but it actually is. It has a crust and a filling so in my book, its a VARIETY of pie. Over the course of my "52 Weeks of Pie," you will see tarts, pies and galettes, a free form type of pie. So keep checking back, you'll be glad you did!
The first different thing for me was the crust. It's put together much like the others with just the addition of cocoa powder. I did use the vodka again instead of the water or milk as suggested because I wanted to keep the dough really cold. These crusts go together quicker using the food processor to make them and I wanted to keep all that frozen butter as chill as possible.
Yes Ma'am that's a LOT of butter, and it's going to make the crust flakey and buttery so it stays! Once that is all pulsed in it looks a lot like sand.
Next, come the egg yolk and the 3 Tbsp of vodka (milk or water).
See that rich color? Yes, I have chickens and they lay the most beautiful eggs with dark yellow egg yolks!
In it goes...
Next comes the vodka in all its glory...
You'll have to take my word for it, that is vodka... The recipe called for 3 Tbsp but I have to tell you, it seemed really dry to me at that stage so I added in another lid full of vodka. Now don't be thinking those thoughts!!! I could squeeze this dough and it would hold the shape as you can see from the top of the picture. And since I had already added in another lid full already, I turned it out and attempted to form into the disc.
Which it did do but let me tell you, that was a bunch of work. I do think it's going to be really dry when I get to the rolling out stage and I may have to wet my hands to work the dough and get it a bit more pliable and flexible.
It does look dry doesn't it? So into the refrigerator it went for the two-hour rest. Maybe some magic will happen in there when I have my back turned making the caramel for the tart.
Oh, and let me say really quickly here, this makes 6 - 4-inch tarts or 1 9-inch tart and I'm going for the larger one because I had the pan!
Tart pans have the "floating" bottom crust pan that can be removed when serving. The crust is baked in the pan and then filled with the caramel and ganache topping and when serving you can push the bottom pan out of the sided pan and serve your tart that way. In to bake the crust goes full of my pie weights and parchment paper.
I'm not going to lie you guys. There were problems with the crust, small ones and I rolled with it. The next time I will do better about the pressing into the pan. It's not the end of the world, it's covered up by loads of caramel and chocolate and no one is ever going to know unless I say something! Don't stop your passion just because there are a few flaws along the way. I can't wait to look back at the end of the year and see my progress!
While that is baking up, its time to make the caramel. I don't know about you, but this was the first time for me. I added the sugar, water, salt and cream of tarter and let them "gel" together in the pan. NO STIRRING! You can swirl the pan to mix things a bit but no stirring. Once the sugar mixture begins to turn amber-colored, it is removed and butter and cream are added in...now you can stir! It smells and looks so good. This mixture is put into a measuring cup to cool.
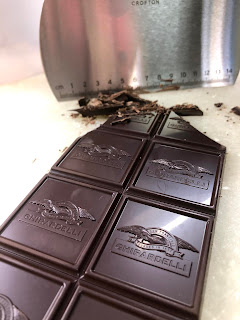
Next is the ganache filling. This is the Bittersweet Chocolate I used.
Yum, YUM!! There is just something about chocolate of any kind! It looks so good!
Using a knife or metal bowl scraper to cut the chocolate finely.
A little cream and a little sugar and voila! Beautiful Ganache!
That's the pie by the way. Yes, it turned out REALLY good. The sweet chocolate, crunchy chocolate pie crust, chewy caramel filling, and the sprinkle of salty salt.... oh my GOSH!! The perfect Valentine's Dessert.
I was very intimidated when I saw the picture of this on the internet and didn't feel like my skills were up to baking a wonderful dessert like this. I was even thinking I would do it over a few days so I wouldn't rush anything and ruin it. But you guys, it was easy! Easy and a very flashy dessert that will have your family or guests coming back for more AND going to bed dreaming those sweet, salty, "caramelly" dreams for more.
I hoped you enjoyed this weeks' pie making as much as I did. And let me tell you, don't be afraid of doing things that seem hard. Bite them off little by little if you have to. Imagine your success and be sure to fill your pie and your lives with love. Thanks for joining me this week and come back next week for another pie.
Karen


Comments